
Adding & editing recipes
Adding a recipe
From your recipes list, or a category’s own page, tap Add Recipe. A sheet titled Add a recipe opens over the page:
- Paste a link or the recipe text is one box, with an Import button under it. Paste a recipe page’s address, or the recipe itself, and tap Import. Enter starts a new line in the box; Ctrl+Enter, or ⌘+Enter on a Mac, imports too. Mirepoix reads it for free and, when it reads cleanly, opens the editor with the recipe filled in — see AI import for how the read works.
- Choose a file opens a file picker for a recipe file, a backup, or a photo of a recipe — see Markdown import.
- From a photo hands you to Mirabel, who reads a picture of a recipe on paper. Reading a photo takes AI, so this button is there only when the deployment has an Anthropic API key, and the photo is read only when it also has a Mistral key.
- Type it myself opens a blank recipe on its own full-page editor. Typing a recipe yourself never needs AI.
A printed page or a photo, for free. To bring in a cookbook page or a photo without Mirabel’s photo reader, copy its text yourself. Live Text is Apple’s built-in text recognition on iPhone, iPad and Mac. On a device that supports it, select the recipe’s text in the photo, or in the camera’s view of the page, and copy it. Then tap Add Recipe, paste it into Paste a link or the recipe text, and tap Import. Any other way of copying text out of an image works the same.
The sheet reads it like any pasted text. If it reads cleanly, the editor opens with the recipe filled in. If it reads but not cleanly, the sheet says so, and Open it anyway opens what Mirepoix made of it. If it finds no recipe, the sheet says that instead, and you can try pasting only the recipe’s text. AI import covers each outcome. This read is free. It sends nothing to Anthropic, uses none of your monthly AI allowance, and works on a deployment with no Anthropic API key, where From a photo isn’t offered. As with any pasted text, the lines it takes for the ingredient list can go to Typesafe AI, an outside AI service; Data and privacy says what. It can also work on a page Mirabel’s photo reader turns away. Text recognition can misread a number or a fraction, so check the amounts in the editor before you tap Save to kitchen.
When a recipe the sheet reads names no category of its own, Mirepoix may suggest one of your kitchen’s categories for it, by sending the recipe it read to Typesafe AI. The suggestion is already picked in the editor’s Category menu, and you can change it before you save.
To close the sheet without adding anything, tap ×, tap outside it, press Esc, or use the Back button.
However you start, nothing goes into your kitchen until you tap Save to kitchen in the editor. Fill in or check the fields, tap Save to kitchen, and you’ll be taken directly to the new recipe page.
If your kitchen already has a recipe with that title, Save to kitchen saves nothing and replaces nothing. It marks the Title box: “You already have a recipe called Focaccia. Give this one a different title, or open that recipe from Recipes.” What you typed stays in the editor. Change the title and save again, or open the existing recipe from Recipes. A title that differs only in capital letters or a mark like “!” counts as the same title.
The editor is one full-page document — the same one that opens when you edit an existing recipe. Fill it in top to bottom: a box labeled Title and one labeled Description, then a plain form holding the Serves, Makes, Time, and Category fields, a Tags row, and Source and Source URL one above the other, then the recipe’s body. What you type into the recipe — the title, the description, the header’s boxes and tags, and every line of the body — is set in a fixed-width face, while labels and buttons keep the app’s own type.
A new recipe’s body starts empty, with two buttons where the steps will go: + Step and + Ingredient. Each one makes the recipe’s first line — a step title or an ingredient — and puts the cursor in it. The two buttons come back whenever the body has no lines left, including when you’ve removed every line in it.
Every field in that form starts with its name. Serves, Makes and Time are made of small boxes, and each box has its own small label above it that says what goes in it: from and up to in Serves and Makes, of what for the word Makes counts in, and total and active in Time. The word to sits between a range’s two boxes. Category, Source and Source URL show a short example under the name instead — For example, Breakfast. under Category. Tags has neither. Everything lines up on the same left edge as the Title and Description boxes.
Serves and Makes take a number in from. The up to box is for the high
end of a range — leave it empty when the recipe gives a single figure. Type a
dash right after the number in from and the cursor moves to up to
instead of typing the dash, so typing 4-6 puts 4 in one box and 6 in the
other. Serves takes whole numbers. Makes takes a decimal or a fraction as well,
so one and a half batches is 1.5, and half a loaf is 0.5 or 1/2. A fraction
turns into its decimal when you leave the box — 1/2 shows as 0.5, and 3/2 as
1.5 — and that decimal is what’s saved. It’s rounded to three places, so 1/3
becomes 0.333.
Makes takes the thing you’re counting in its of what box (“rolls”). That box needs a word, not a count: the count belongs in from, so a number standing on its own at the start of the box (“12 loaves”) stops Save to kitchen, and the box reads Makes needs a unit noun, not a second count, like “12 cookies”. A number attached to a word is fine, since it’s describing the thing rather than counting it — “3-inch biscuits” and “loaves, 9x5 inch” both work.
Tap into the of what box and a list of words opens beside it — the words Mirepoix
counts yields in, from cookie and loaf to jar and slice. Keep
typing and the list narrows to the words that start with what you’ve typed, and
either form finds the word: type rolls and roll is what’s offered.
Choosing a word writes the singular. Arrow keys move down the list, Enter or a
tap chooses, and Escape closes it. Nothing is limited to the list — a word
Mirepoix doesn’t know is offered back at the top as keep “kolache” and stays
exactly as you typed it.
Under the Makes boxes a line shows how the recipe page will read the count and the word together — Reads as 12 rolls., or Reads as 1 roll. for one, and a range agrees with its high end. It’s there only for a word from that list; a word of your own is saved as you typed it and gets no line.
Time is one field of two boxes: total for the whole recipe, start to finish, and active for the hands-on part. Each box has a menu after it offering min, hours, days and weeks, so a two-week ferment is 2 and weeks rather than a number of minutes. A decimal works too — 1.5 hours is an hour and a half — as long as it comes to a whole number of minutes: 1.1 hours is 66 minutes and fine, while 1.5 min isn’t. A time you’ve already saved comes back in the largest unit that fits it exactly — 120 minutes as 2 hours, 4320 as 3 days, 20160 as 2 weeks — and otherwise in minutes, so a 90-minute recipe comes back as 90 min. The recipe page reads it the friendly way either way: 90 shows as 1 hour 30 min.
Each number box takes only what it can hold: digits everywhere, one decimal point in the two Makes boxes and the two Time boxes, and a slash in the two Makes boxes for a fraction. Anything else you type or paste doesn’t go in — the box keeps what it had, and a short line under the field says why for a few seconds: Numbers only here. In Makes it reads Numbers only here. The word goes in the last box. Paste a whole range like “4-6” into a Serves or Makes from box and it reads Numbers only here. Put the high end in the up to box. A value that arrived some other way — from an import, or an older draft — is kept as it came and marked (below), never cleaned up behind your back. You can still delete from it or type digits into it.
A value one of these fields can’t save marks the field: the box at fault gets a red ring, and a message with a ! badge appears just below that box, naming the fix. A box is marked when you leave it, when you press Save to kitchen, and when the editor opens with a value in it that can’t be saved. A Time box is also checked again the moment you change its unit menu, so 1.5 with min is marked and switching to hours clears it. It’s never marked while you’re still typing in it for the first time. Once a mark shows, it updates as you type and goes the moment the value is fixed. The messages are:
- Enter a whole number above zero, like 4. — Serves, for a 0
- Enter a number above zero, like 12. — Makes, for a 0, or a fraction that isn’t a number, like 1/0
- Enter a time above zero that comes to whole minutes, like 90 min or 1.5 hours. — either Time box, for a 0, or for a number that doesn’t come to whole minutes in the unit you picked, like 1.5 min
- Add the low end here too. — on from, when up to is filled and from is empty
- Say what it makes, like “cookies”. — on of what, when Makes has a number but no word
- Say how many it makes, like 12. — on Makes’ from, when of what has a word but there’s no number
- Add the total time too. — on total, when active is filled and total is empty
- Active time can’t be longer than the total time. — on active: 45 min active under a total of 30 min is refused, and equal is fine. The two are compared as time once each unit is applied, so 1 hour active under a total of 90 min is fine
An empty field is never a problem on its own; it only means you haven’t said.
Save to kitchen never greys out. Press it with anything marked and it doesn’t save: it marks every problem on the page and puts you in the first box that needs fixing. The top of the recipe, above the title, then lists them — Not saved yet. 2 things to fix: followed by each message, and each message is a link that takes you to its box. A short line just above Discard draft and Save to kitchen gives the count — Not saved yet. 2 things to fix. — next to the Draft saved line, never in its place. In the iPhone and Android apps, where ✕ and ✓ stand in for those two buttons, the count line still shows at the bottom of the screen. Fix one problem and it drops off the list; fix the last and both the list and the count go.
Moving to the of what box this way doesn’t open its list of words, so the message stays in view. The list opens as soon as you type in the box or tap it.
Type a range backwards and it’s turned around for you rather than treated as a mistake. Put 8 in from and 4 in up to, leave the box, and they trade places. Type the same number in both and up to empties, since that isn’t a range. Makes behaves the same way, and so does a Save to kitchen pressed before you left the box.
The body is a single list of lines, not a fixed set of step forms. Add whichever of four kinds you need from the buttons on the step cards (below): a step title, an ingredient, a paragraph of instructions, or a recipe import (see Cross-references). Mirepoix works out the steps from where the titles land — everything from one title down to the next, or down to the end of the recipe, is one step. Leaving a title blank is a deliberate way to start a step without naming it, useful for splitting a recipe into parts without giving every one a heading. An ingredient that comes right after a paragraph starts a fresh, unnamed step the same way, automatically — so every part of the recipe still reads as its own ingredients followed by its own instructions. And a recipe import doesn’t have to stand on its own: put one before a step’s ingredients, after them, or between two ingredient groups.
Each step is drawn as a card: a framed panel holding that step’s lines. A step with a title opens with its number — STEP 1, STEP 2 — beside its title box. A title box you’ve left blank shows Untitled step in it, as a placeholder, and it still starts a step. Inside the card, INGREDIENTS sits over the first ingredient of each run of ingredients, and INSTRUCTIONS over the first paragraph of each run of paragraphs. A recipe import sits inside its step’s card, wherever you put it among that step’s lines, so an ingredient after it gets its own INGREDIENTS label again.
Two kinds of step have no title line. Lines above the recipe’s first title form the first card, and an ingredient right after a paragraph starts a new card. Either card shows its number with Untitled step beside it, in place of a title box. Save the recipe and open it again, and such a step has a blank title box of its own, reading Untitled step.
The cards follow the lines as you work. Add a title, or put an ingredient after a paragraph, and a new card starts there; remove one and the cards re-form at once. A removed line stays where it was, struck through, inside the card of the line above it (or of the line below it, at the very top), so you can undo it — but it no longer marks where a step begins, and never carries a step’s number.
To add a line, use the buttons on the cards. Each has a dashed outline and a + before its name, and each sits where its new line will land:
- + Ingredient ends each run of ingredients, just above that step’s instructions, and adds an ingredient row right there. When instructions have no ingredients above them, it sits on the line just above them instead — the step title, or a recipe import — and the row lands between that line and the instructions
- + Instructions sits beside it when that part of the step has no instructions yet
- + Cross-reference sits at the foot of every card, under its last line, and adds a recipe import there
- + Step sits under each card, outside its frame, and starts a new step right after that card, with its title box ready to type in. A card followed by an untitled card has none, since a title added there would name that next card — use its + Title instead
- + Title sits beside Untitled step on a card with no title line, and adds a title above that card’s first line
A step that’s only a title so far, or one whose last line is a recipe import, shows + Ingredient and + Instructions on that last line. Either one starts the step’s ingredients or instructions right under it, in the same step. When a card’s last line is struck through, the buttons that end the card sit on the last line that isn’t, above the struck one, and + Step stays under the card.
The new line takes the focus, so you can type straight into it: the ingredient box of a new row, the box of new instructions, the Recipe box of a new recipe import, or the title box of a new step. A screen reader hears each button with the step it adds to — Add Ingredient to step 2, Add a Step after step 2 — and, once you’ve pressed it, what was added: “Added an ingredient to step 2.”
To give lines at the top of the recipe a title, press + Title on their
card. To start a new step partway through a step, add a step with + Step
and move its title up with Move line up until it sits where the new step
should begin, or type ## at the start of a line of instructions: the rest of
that line becomes a new step title, and the lines after it become that step’s
instructions. move to top in the ⋮ menu carries a title to the very top
of the recipe in one tap. To put a title anywhere in one go, use
Rearrange and move the title alone.
Each ingredient gets its own row of four boxes: Ingredient, Amount,
Unit, and Prep. Write 1½ in the amount and cups in the unit — the
number goes in one box and the word in the other. All four boxes are on screen
the whole time, filled or not, so every line reads as the same shape, and
working in a line never adds a box or moves one. An empty prep box shows a
quiet prep note; the other three are named by the column names or labels
around them.
The one exception is a line with a package, which shows Set by the package
where its amount and unit would be.
The cards stand in from the document’s left edge, leaving a narrow empty lane
beside them: that’s where a line’s tools land when you work in it.
The amount and unit travel together as one pair: whether that pair comes before the ingredient box, and which one Tab reaches first, follows your kitchen’s Ingredient lines choice in Settings. On a computer the ingredient, amount and unit sit on one line in that order, with the prep note on a line of its own just under them, starting under the ingredient box, and the column names — Ingredient, Amount, Unit — sit once over the first row of each run of ingredients. The amount and unit columns are the same width on every row, so the boxes line up down the card. On a phone the row stacks instead, and every box has its own small label above it. In a kitchen that lists the ingredient first, the ingredient box takes the first line, the amount and unit sit side by side under it, and the prep note takes the last line. In a kitchen that lists the amount first, the amount and unit come first, then the ingredient, then the prep note. On a narrow phone, or at the largest text size, every box takes a line of its own.
Each row ends in a round button with three dots, More for this ingredient. Tap it and the row’s panel opens under the row, holding everything that isn’t one of the four boxes, in this order:
- Optional ingredient — a checkbox for an ingredient you can skip
- Second measure — an amount and a unit box (below)
- Package — count, kind, size of each and size unit boxes (below)
- Substitutes — the ingredient’s or lines, and Add a substitute
- Matched to — the ingredient the line is matched to (below)
- Remove ingredient
Tap the button again to close the panel. One row’s panel is open at a time: opening another row’s closes the first. When a row’s panel holds something — the line is optional, a second-measure or package box has something in it, or it has a substitute — a small dot sits just outside the button’s top-right corner, so you can see it with the panel closed, and a screen reader hears options set after the button’s name.
Each ingredient row with something typed in it also shows a mark at its left end — a blank row you’ve just added shows none: ✓ when the line is matched to an ingredient or kept as written, ? when it isn’t matched. While any row shows ?, a line at the top of the recipe’s body counts them — 2 ingredients to check — with Next › to step from one to the next. The match lives under Matched to in the row’s panel, where you choose the ingredient the line means or keep it as written. It shows in whichever row’s panel is open: open the panel yourself, tap the row’s ✓ or ?, or reach the row with Next › or the recipe page’s ingredients to check link, and the panel opens with it. Typing in a box, or moving from box to box, never opens a panel or moves the match to another row. See Check ingredients.
As you type an ingredient’s name, a short list of ingredients with matching names opens under the box once you pause. Pick one — tap it, or use the arrow keys and Enter — and its name fills the box and the line is matched to it, the same as choosing it under Matched to. Keep typing, or press Escape, and the line keeps your own words and is matched as usual. Nothing in the list is picked until you move to it, so Enter on its own still starts a new line.
Tap into the unit box and a list of words opens beside it. The words that weigh for that ingredient come first, under a heading naming it — Works for Butter — each showing the grams it comes to, so pat reads 5 g and stick reads 113 g. Those two are Butter’s own words — named portions the ingredient carries. Under a quiet Also priced by come the general measures Mirepoix can convert for it: cup, g, oz and so on. The rest of the measures Mirepoix knows follow, under Other measures.
The split tells you what a word buys you. A word from the first group weighs for this ingredient, so Mirepoix can work out how much the line comes to and count it toward the recipe’s nutrition. A word from the second doesn’t weigh for it — it’s kept and shown on the recipe page, but nothing is weighed from it. The Also priced by line is a finer point inside the first group: both halves weigh, and it only says where the word came from. It shows only when that group holds both kinds. Nothing is off limits: type any word you like and the list offers it back at the top as keep “knob”, so a word Mirepoix doesn’t know stays yours.
The list belongs to the ingredient on that row. On a saved line, that’s the
ingredient it’s matched to, even when the line’s words name it differently. A
saved 2 sprigs thyme line matched to Thyme (fresh) lists the words for Thyme
(fresh), under Works for Thyme (fresh). Choose another ingredient under
Matched to and the list follows your choice. A new line, a line you’ve
renamed, or one kept as written lists by the words in its ingredient box, so
changing the name changes the list. A substitute’s unit box reads its own
name, not the one above it. The second measure’s unit box and the package’s size unit
box offer the measures Mirepoix knows, and the package’s kind box offers
the kinds it knows, such as can, jar or bottle.
Arrow keys move down the list, Enter or a tap chooses, and Escape closes it. Keep typing and the list narrows to the words that start with what you’ve typed. Narrow it far enough that only one kind of word is left and the Also priced by line goes too.
Some amounts are really two measurements — 1 can, and the 15 oz in the can.
Open the row’s panel and use the two Second measure boxes: an amount and
a unit of its own. Write 15 and oz and the recipe page reads 1 can
(15 oz); the second measure scales with the first. Empty both boxes and it’s
gone. Nothing is guessed from what you type in the amount — the second measure
is boxes you fill in yourself, the same as the package.
An ingredient you buy by the package uses the panel’s Package boxes:
count, kind, size of each, and size unit. Write 2, cans,
14.5, and ounces, and the recipe page reads 2 cans, 14½ oz each.
Recipe text fills these boxes too. Paste a whole recipe, or import a recipe
file, with a line like Tomatoes, 2 cans, 14.5 oz each — or 1 can, 15 oz for
a single can — and the line opens with 2, cans, 14.5 and oz in
its Package boxes. A recipe page’s own spellings, like 2 8-ounce cans or
6 (6-ounce) cans, fill them the same way, the size going in size of each.
The amount box doesn’t do this: type the same words there
and they stay an ordinary amount. The spelling’s rules are in
Recipe format.
The count and the kind are the line’s amount. Once both are filled in, the row’s amount and unit boxes give way to the words Set by the package, in the same place on a computer and on one short line of their own on a phone. Empty the count or the kind and the amount boxes come back, holding whatever they last held: the amount the line had when you opened it, or whatever you typed there before you filled the package in. They don’t follow the package while it’s set, so if you’ve since changed the count they’ll be showing the old one — read them before you save.
Size of each and size unit say how much is in one package — not how much you need in all. Mirepoix never multiplies the two together for you; the recipe page shows your count and your per-package figure side by side. Scaling follows the same rule: double the recipe and 2 cans, 14½ oz each becomes 4 cans, 14½ oz each. You need twice as many cans, and a can is still the same can. Scale down far enough and the count reads as a fraction — ½ can, 14½ oz each. When the count is exactly one, the “each” goes, since there’s only one: 1 can, 14½ oz.
A package needs both a count and a kind. Leave size of each and size unit empty and 2 cans on its own is still a package. A size with no count isn’t one, and isn’t kept. Write the size unit in a measure Mirepoix knows, like ounces or grams, and the recipe’s nutrition can use the package; an unfamiliar word is kept and shown on the recipe page, but nothing is weighed from it. A count or size that isn’t a number stops Save to kitchen and marks that box, with a message just under it — Package count must be a number. When the editor takes you to a box in the panel — after Save to kitchen, or from a message’s link — it opens the row’s panel first. Close the panel while a box in it is marked and the row’s three-dot button shows a red ring.
A package travels with the line it describes. Promote the first substitute with Move line up and the package trades places along with the names and amounts. A substitute has no package boxes of its own — it keeps one it arrived with, and promoting it is how you reach those boxes.
Press Enter in any of an ingredient row’s four boxes to start the next ingredient row right under it. Enter on an empty ingredient row removes that row and moves on: to the next line of the same card, usually the step’s instructions, or — when the row was the card’s last line — to the add button that now ends the line above it (+ Instructions when that part of the step has none, otherwise + Ingredient, or + Step when neither shows there). Enter in a step title moves into its step, to the first line under the title; on a title with nothing under it yet, it starts an ingredient row right after the title. Backspace at the start of a box steps back to the box before it; at the start of an empty ingredient row it removes the row. Inside a paragraph, Enter is a plain newline — that’s how a block of instructions gets more than one line, or more than one paragraph, without leaving the box.
Click or tap into any line — a step title, an ingredient, a paragraph, or a recipe import — and a rail of three controls stands beside it, in the empty lane left of its card. Top to bottom: Move line up, a ⋮ (Line options), and Move line down. The rail has its own outline, and the line you’re working in shows a bar down its left edge, inside the card. Move the line and the rail travels with it.
An ingredient moves within its step’s ingredients. Move line up and Move line down trade its place with the ingredient above or below it in the same group. At the top or bottom of a group, the next press jumps it past whatever is in the way — a step title, a paragraph, or a recipe import — into the next group that way, whether that group is past a recipe import in the same step or in the neighboring step. Going up, it lands after that group’s last ingredient, above its instructions; going down, it lands before that group’s first ingredient. A group with instructions and no ingredients takes it just above the instructions, and a step that holds only a title, or a title and recipe imports, takes it just under the title. So moving an ingredient never puts it among a step’s instructions. Move line up is unavailable when there’s no group above to go to — on the first step’s first ingredient, even with the step’s title above it — and Move line down when there’s none below.
Every other line — a step title, a paragraph, a recipe import — moves one line at a time and trades places with whatever line is next to it, of any kind. For those, Move line up is unavailable on the very first line of the recipe, and Move line down on the very last.
To carry a line farther than its neighbors, or to move a whole step, use Rearrange instead: pick the line up there and put it down wherever it can go.
After a move, the control you pressed keeps the focus, so pressing it again moves the same line again. When the move uses that control up — Move line down on what is now the last line it can reach — the ⋮ takes the focus instead. Every move is announced for a screen reader, and says where the line landed: “Moved up. Now line 3 of 11.” When an ingredient’s move carries it into a different step, the announcement names that step: “Moved down to step 2. Now line 5 of 5.”
The ⋮ menu is the same for every kind of line. move to top and move to bottom carry the line to one end of the recipe in a single tap, rather than pressing an arrow over and over; they act on lines of the recipe, not on a substitute. Below a divider is remove. remove strikes the line through and leaves it in place, no confirmation needed, and the menu item becomes undo — pick it to bring the line back. A struck-through line is left out for good only when you press Save to kitchen, so nothing is lost before then. (Backspace at the start of an empty ingredient row still removes that row outright, with no undo — there’s nothing on it to bring back.)
An ingredient’s panel has its own Remove ingredient button, which does the same thing as remove. On a struck-through ingredient it reads Restore ingredient — tap it to bring the line back. The rest of a struck row’s panel fades, and opening a struck row’s panel doesn’t bring the match into it.
What you type in a box stays in that box. A comma, colon, or semicolon is part
of what you wrote — type Salt, flaky in the ingredient box and that whole
phrase is the ingredient’s name. The amount box is the exception: a phrase after
a comma that isn’t a measure of its own — 1 1/2 cups, divided — moves to the
prep note when you save, so the amount stays an amount and the line still
scales. See Recipe format for
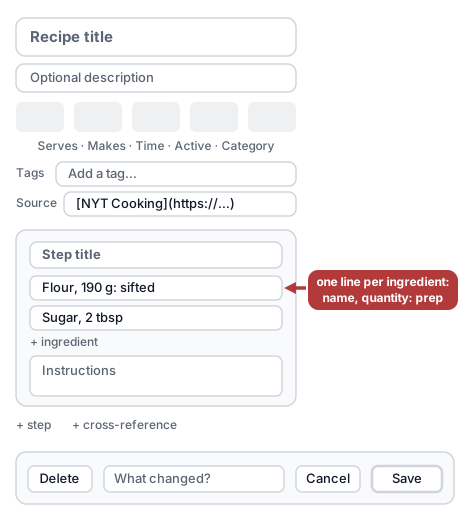
which phrases move and which are kept whole. Paste several lines into the ingredient box at
once and each one becomes its own ingredient. Each pasted line written
Name, amount: prep note lands across the row’s boxes — the whole amount in
the amount box, which is read apart into a number and a unit when you save —
and a leading - is dropped. See
Recipe format for that
grammar.
Optional ingredient, the checkbox at the top of the row’s panel, marks an ingredient you can leave out; untick it to make the ingredient required again. It marks the whole line — every version of it — rather than one substitute, and it stays with the line when you promote a substitute. See Recipe format for how the line reads on the recipe page and in its exported text.
Add a substitute, under Substitutes in the row’s panel, adds an alternative for the ingredient: an or line with four boxes of its own — ingredient, amount, unit, then prep note, in that order — and the cursor lands in its ingredient box, ready to type. A new substitute goes at the end of the row’s substitutes, so a run of them keeps the order you added them in. The amount, the unit and the prep note are all optional; give a substitute a note when that version is prepped differently, like “shake well” on an oat milk. On a computer the note sits on its own line under the substitute’s name, amount and unit; on a phone the name takes a line, the amount and unit sit under it, and the note comes last. An ingredient takes up to eight substitutes, not counting struck-through ones; at eight, Add a substitute is unavailable. Enter and Backspace do nothing special inside a substitute’s boxes.
Work in a substitute’s boxes and the line tools move beside it. Move line up and Move line down reorder it among the ingredient’s own substitutes — except on the first one, where Move line up promotes it instead: it and the ingredient above trade places — names, amounts, and prep notes together — so the substitute becomes the ingredient and keeps its own note. remove in the ⋮ menu strikes a substitute through and offers the same undo. A substitute you never gave a name to is left out when you press Save to kitchen, even if you typed an amount or a prep note on it.
Every ingredient needs a name. Tap Save to kitchen with an amount, a prep note, a package or a substitute on a row but no ingredient, and it doesn’t save: the ingredient box on every such row is marked, with Give this ingredient a name. just under it, and each one joins the list by Save to kitchen. There’s no message at the top of the page for it. Type a name and that row’s mark goes, or remove the row and the mark goes with it. A row with nothing typed in it at all is simply left out.
A couple of things sort themselves out when you save. A paragraph row you left completely empty isn’t saved as a blank paragraph — it just isn’t part of the recipe, though it stays visible, right where you left it, until you save or reload the page. Two paragraph rows typed one after another come back — on save, and again if you reload — as one paragraph block holding both paragraphs, joined by a blank line, the same way a single longer paragraph already reads. A step title left blank is treated the opposite way: it’s kept, not dropped, since that’s how you mark a deliberate, unnamed step break. On the recipe page, a step you never gave a title just starts with its ingredients or its instructions, with no heading above them.
Source records where the recipe came from — a name (like a site or cookbook)
and a web address, in their own fields. Fill in either or both. Mirepoix shows
it as a byline under the title and again at the bottom of the recipe page, and
links out when you gave it an address.
Import from a link and it’s filled in for you. See
Recipe format for the Source:
line these two fields become in a recipe file.
The recipe editor is one full-page document. From the top: a box labeled Title and a box labeled Description, each label above its box, then the header as a plain form, everything lined up on the document’s own left edge. Each field starts with its name. In Serves, Makes and Time every box has its own small label above it instead of an example line: Serves and Makes each have a “from” box and an “up to” box with the word “to” between them, and Makes a third box, “of what”, for the word it counts in, on its own line under its two numbers; Time is one field of two boxes, “total” and “active”, each followed by a unit menu offering min, hours, days and weeks; the figure shows 45 and 15, both in min. Category is one menu, with a short example under its name (“For example, Breakfast.”). Serves, Makes and Time sit side by side as far as the width allows — all three in one row on a wide screen, one to a row on a phone — and Category always starts a row of its own; the figure’s narrow document puts Serves and Makes side by side, then Time, then Category. Then a Tags row, with no example or box labels, then Source and Source URL stacked one above the other, each with its example line and a box spanning the column of fields. Then the photo region — shown when editing a saved recipe, with an Add photo button when the recipe has no photo or the photo itself with Replace and Remove when it has one — then the recipe’s body. While any ingredient line still needs checking, the body is headed, on the document’s own left edge, by a line that counts them — “1 ingredient to check · Next ›” — and Next steps from one to the next. Under that, also on the document’s own left edge, sits a Rearrange button, which turns the body into an outline for moving lines and whole steps. Under it, the body is drawn as step cards: each step is a framed panel holding its lines, set in from the document’s left edge so that a narrow lane runs beside it, empty until a line’s tools land there. The figure shows one card. It opens with “STEP 1” beside the step’s title box, “Dough”. Under that, “INGREDIENTS” heads the step’s two ingredient lines, and “INSTRUCTIONS” heads its instructions box, which shows its placeholder, “Instructions”. Not drawn: further cards, numbered “STEP 2” and on, each starting at a step title or at an ingredient right after instructions; a card with no title line — the lines above the first title, or an ingredient after instructions — which shows “Untitled step” beside its number in place of a title box, with a dashed “+ Title” button beside it; and a recipe import, which sits inside its step’s card between two groups of lines. Over the step’s first ingredient line sit the column names, once, in a kitchen that lists the ingredient first: “Ingredient”, “Amount” and “Unit”. Each ingredient line is three boxes on one line under them, with no punctuation between them, and the prep note’s box on a line of its own just under them, starting under the ingredient box — the first line reads “Flour”, “190”, “g”, then “sifted” under them — and the amount and unit columns are the same width on every line, so the boxes line up. That layout is how a computer shows it. On a phone the row stacks instead, with a small label above every box: the ingredient on the first line, the amount and unit side by side under it, and the prep note last; in a kitchen that lists the amount first, the amount and unit come first, then the ingredient, then the prep note; on a narrow phone or at the largest text size, every box takes a line of its own. Just left of the boxes, inside the card, every ingredient line with something typed in it carries a mark (a blank line you’ve just added shows none): the first line shows a quiet ✓, because it’s matched. At the right end of every line is a round button of three dots, More for this ingredient. The first ingredient line is the one being worked in: a bar runs down its left edge, inside the card, past its open panel, and in the lane beside the card stands a rail of three controls with an outline of its own, top to bottom: Move line up, a ⋮ (Line options), and Move line down. Its ⋮ is open, and the menu beside it lists move to top and move to bottom, then, under a divider, remove; nothing in it is only for ingredients. The first line’s three-dot button is open, and its panel lies under the line, in this order: an “Optional ingredient” checkbox, unticked; “Second measure”, with an “amount” box and a “unit” box, both empty and showing the examples “120” and “grams”; “Package”, with “count”, “kind”, “size of each” and “size unit” boxes, empty and showing “2”, “cans”, “14.5” and “oz”; “Substitutes”, with an “Add a substitute” button and no substitutes yet; “Matched to”, holding the match: a button naming the ingredient the line is matched to — “Flour (all-purpose)” — which opens the ingredient menu, then a read-out of what the line comes to — here its amount, weight, calories and grocery aisle, “190 g · ~190 g · 692 cal · Baking”; and last, a red-outlined “Remove ingredient” button. On some lines a Split into … or Use the page’s line link follows the read-out — Split when a whole line sits in the ingredient box with the amount and prep note empty, Use the page’s line when an imported line now reads differently from its page; this one has neither. The match shows only in the one panel that’s open, and opens with it — from the three-dot button, a tap on the line’s mark, Next, or the recipe page’s link — never because you typed or moved into a box. The second ingredient line, “Pearl sugar”, is the one the count at the top means: its mark is a ?, a filled red badge, because it isn’t matched. It shows the same four boxes with nothing typed in the prep box, so that box shows its own word, “prep note” (the other three boxes show no word of their own when empty; the column names say what they hold): every box is there on every line, whether or not you’re working in it, and empty ones stay in place rather than appearing as you go. Its line is marked optional, so its closed three-dot button has a small dot just outside its top-right corner: something in its panel is set. Not drawn: a package line, whose amount and unit boxes give way to the words “Set by the package” once the package has a count and a kind. The card carries its add buttons, each with a dashed outline, where the line it adds will land: “+ Ingredient” under the second ingredient line, the step’s last, and above “INSTRUCTIONS”; “+ Cross-reference” at the card’s foot, under the instructions box; and “+ Step” under the card, outside its frame. The step already has instructions, so it shows no “+ Instructions”, which would sit beside “+ Ingredient”. What’s typed into every box — values and placeholders alike — is set in a fixed-width face, while labels, menus and buttons are not. Then the footer, typed text with no box around it, on the document’s left edge under a short rule, whose placeholder reads “Optional notes or source (rendered after a divider)”, then, at the very end of the document, a centered Delete this recipe button. A small card centered under the document holds Discard draft and Save to kitchen.
Rearranging a recipe
To move lines from one step to another, move a whole step, or change where a step starts, use Rearrange. It shows the recipe’s body as an outline you reorder by tapping, or by dragging with a mouse, with no boxes to type in. To nudge one line while you type, use the line tools beside it instead.
- Tap Rearrange, just above the first step card.
- Tap the grip at the start of the line you want to move. The places it can go light up, reading Place here (or Join these instructions, below).
- Tap the place you want. The line moves there, and the steps re-form around it.
- Tap Done rearranging to go back to the editor.
The editor comes back with every line where you put it. Each move is an edit like any other: your draft keeps it as you go, and Save to kitchen publishes it.
Drag a line instead
- Press a grip and move it, with a mouse or a pen. A tag showing what you’re moving follows the pointer.
- Move toward where it should go. The places it can go appear as thin drop lines, and the nearest one, once you’re close, turns thicker and red.
- Let go while a drop line is lit. The line moves there, as if you’d tapped that place.
To change your mind, let go where no drop line is lit, or press Escape. The line stays where it was, and the line beside the buttons says Put back where it was. Hold the pointer near the top or bottom of the screen and the page scrolls, so you can carry a line past what’s on screen. A press that doesn’t move is a tap, and picks the line up as in the steps above.
On a touch screen, such as a phone or a tablet, a finger doesn’t drag: move a line by tapping its grip and then the place, as in the steps above. A grip scrolls the page like any other part of it. Tapping a grip and then a place works with a mouse too.
Rearrange can end while you’re dragging: you tap Done rearranging, or Save to kitchen sends you to a box to fix. The line you were dragging then stays where it was.
What the outline shows
While you rearrange, the outline takes the place of the step cards, and the title, the header form, the photo, Formatting, the line counting ingredients to check, the footer and Delete this recipe… step aside. Discard draft and Save to kitchen stay.
Each step is a card, and each of its lines is one row: an ingredient reads as
its amount, unit, name and prep note (1 cup flour, sifted), a step title
starts with #, instructions show their text in italics, and a
cross-reference reads From another recipe: and the recipe’s name. A
blank step title reads Untitled step. A long row is cut off at the edge;
at a large text size on a phone, rows wrap instead. Lines you’ve struck
through with remove aren’t shown.
Every row starts with a grip, a small button of dots, and every card has a grip marked STEP, down its left side (across its top when the outline is narrow, as at a large text size on a phone):
- The STEP grip moves the whole step, with everything in it
- A step title’s own grip moves the title alone. The lines that were under it stay put: they join the step above, or become a step without a title
- Any other row’s grip moves that one line
Where a line can go
Only the places a line can go light up, so a move never turns it into something else. A line with nowhere else to go isn’t picked up: the line beside the buttons says Nowhere else for the line to go.
- An ingredient goes in front of any ingredient, at the end of a run of ingredients, or just above instructions that have no ingredients over them. In a step with no ingredients or instructions, it goes just under the title. When a step ends in a cross-reference, it can also go after that, starting a new group. It never lands among instructions
- Instructions go at the end of a group of ingredients and instructions in any step, just under the title of a step with no ingredients or instructions, or after the cross-reference a step ends in. Where that group already has instructions, the place reads Join these instructions. Instructions never land in front of an ingredient, where that ingredient would start a new step
- A cross-reference goes only where every other line stays in the step and the group it was in: in front of a group of ingredients and instructions, after one, or at the end of a step
- A step title goes in front of any line, at the very top, or at the very end
- A whole step goes in front of another step or after the last one, only where it stays a step of its own and takes in no lines from another. A step with no title line that lands anywhere but the top gets a blank title line, Untitled step, so it stays its own step
Joined instructions stay two boxes, one after the other, until you save or reload the page. Two instruction boxes side by side can trade places in the outline. When you press Save to kitchen, or reload, they become one block of instructions, with a blank line between the two.
What the line beside the buttons says
A line beside Done rearranging tells you what’s happening. It starts with Drag a line by its grip with a mouse, or tap the grip and then tap where it goes. The grip marked Step moves a whole step. While a line is picked up, by a tap or a drag, it reads Moving and the line’s name. After you place it, it says where the line went, such as Moved Flour to step 2, after its title., and what re-formed:
- Step 3 joined step 2.
- Step 2 split in two.
- Step 2 is gone. — every line of it moved away
- Step 1 is empty. — a title moved alone, with no lines under it now
- Step 3 has no title line now.
A step that joined, split or is gone is numbered as it was before the move; one that’s empty or has no title line is numbered as it is now.
Undo a move or put a line back
Undo move appears after your first move. Each press takes back the last move and says Move undone., until the recipe is back the way it was when you tapped Rearrange, and then it goes away. It covers only this visit: once you tap Done rearranging, your moves stay, and the next visit starts with nothing to undo.
While a line is picked up, Cancel appears beside the other buttons. Tap it, tap the line’s grip again, or press Escape, and the line stays where it was: Put back where it was.
With a keyboard
- Press Tab to reach a grip. The up and down arrows move between the grips, and Home and End jump to the first and last.
- Press Enter or Space to pick up the line. The focus moves to the nearest place.
- Use the arrows, Home and End to move between the places, then press Enter or Space to put the line there. The focus lands on the line’s grip, in its new spot.
Escape puts a picked-up line back and returns the focus to its grip. It doesn’t end Rearrange — Done rearranging does. A screen reader hears each grip with what it moves, like Move ingredient Flour, and each place with where it is, like Place here, in step 2, before the instructions.
Struck-through lines
Struck lines aren’t in the outline, and moving a single line leaves them where they are. They move only with a whole step: a struck line inside that step, or after its last line, goes with it, and one just above its first line stays with the step above. You can still bring a struck line back afterwards with undo in the ⋮ menu, or Restore ingredient in an ingredient’s panel.
Saving while you rearrange
Save to kitchen works without leaving Rearrange; in the iPhone and Android apps, so does ✓. A save that goes through takes you to the recipe page as usual. If something needs fixing, Rearrange ends and the editor puts you in the box that needs it, with the list of things to fix at the top of the recipe. When the kitchen refuses a save without naming a box, its banner shows and you stay in Rearrange.
Bold, italics, and other formatting
Formatting, at the top of the recipe’s body, opens the list of marks the recipe page reads back. It explains and nothing else — opening it never puts anything into your recipe.
The marks work in a paragraph of instructions, in an ingredient’s or a
cross-reference’s prep note, and in the footer box at the end of the document.
One asterisk around a word makes it italic — *soft* — and two make it bold —
**hard**. A line starting ## is a heading — except in a paragraph of
instructions, where typing it starts a new step instead (above). A run of lines starting - is
a bulleted list, and 1. starts a numbered one. A line starting > is a
quotation, the way to set off a note from whoever handed you the recipe.
Backticks hold a scrap you want left exactly as typed — `350F` — and a
whole block is left alone when you indent it four spaces.
Three shapes take a web address. [here](https://…) puts a link on your own
words, an address written on its own links itself, and 
shows the picture at that address. @[Recipe Title] is Mirepoix’s own fourth
shape, and links another recipe by name — see
Cross-references.
Quotes, dashes and ellipses are smartened as the recipe reads back: "yes"
comes back in curly quotation marks, a --- between words becomes an em dash,
-- an en dash, and ... a single ellipsis character. A table, a
~~strikethrough~~, and an HTML tag all stay as text, exactly as typed. A
fenced block between triple backticks keeps its text but not its backticks —
it prints in a plain code style instead — and a footnote’s marker stays while
the note it points to is dropped, so a footnote isn’t a way to add a note
Mirepoix will show.
The marks don’t reach a step title, an ingredient’s name, or the recipe’s own title and description. An asterisk typed in one of those boxes shows as an asterisk.
One shape is worth avoiding in a paragraph of instructions: a - list reads
back as ingredients if that recipe’s text is ever pasted or imported again. See
Recipe format.
AI import
The Add a recipe sheet that Add Recipe opens reads a link or pasted text on Mirepoix’s own server, without Mirabel. That read is free: nothing goes to Anthropic, and it doesn’t count against your monthly AI allowance. It works the same with or without an Anthropic API key. Anthropic’s AI comes in only when you ask for it: Read it with AI on a read that didn’t come out cleanly, or a photo. One outside service can see part of what the sheet reads: the ingredient lines can go to Typesafe AI, which checks which of them are ingredients. Data and privacy says what it sends.
While it reads, the sheet shows Opening the page… for a link or Reading it… for text. Then one of three things happens:
- It reads cleanly. The new-recipe editor opens with the recipe filled in. A page that publishes its recipe in a form Mirepoix can read lands here, and so does text already written in Mirepoix’s own recipe format.
- It reads, but not cleanly. The sheet opens nothing and says This one didn’t read cleanly. Tap Open it anyway to open what Mirepoix made of it in the editor, and check it over carefully. Or tap Read it with AI.
- There’s no recipe to find. The sheet says Couldn’t find a recipe in that. Tap Read it with AI, or try pasting just the recipe text.
Read it with AI shows only when AI is available: the deployment has an Anthropic API key, and your kitchen hasn’t used up this month’s AI allowance. The sheet stays open and reads the same link or text again, this time with AI, saying Reading it with AI. This can take a minute… while it works. When it’s done, the editor opens with the AI’s draft, and the page’s photo if it named one, the same as a clean read. That AI read is what draws on the allowance. Mirabel isn’t involved, and nothing goes into her chat. If the AI read fails, the sheet says why, and Open it anyway is still there when the plain read made a draft. If the AI read is still going after about three minutes, or the connection drops while the sheet waits, the sheet says so and offers Check on the AI read, which picks up that same read rather than starting another, so it doesn’t draw on the allowance twice. A kitchen gets 30 AI reads an hour (AI import limit reached. Try again in an hour.), and a recipe saved from one counts toward the hourly limit on saving AI imports, like one saved from Mirabel’s draft.
In the editor, nothing is saved until you tap Save to kitchen. When a link’s page names a photo for its recipe, the photo is already there, below the title and the recipe’s details, with Remove under it. Leave it and it’s added to the recipe when you save — see a photo that came in with an import. A recipe you save from the sheet is recorded in its history as your own, with no via Mirabel.
If a page won’t open, the sheet shows the reason instead. Copy the recipe text off the page and paste it in. A few limits apply. Each person opens one link at a time (Still opening the last link. Try again in a moment.). A kitchen gets 30 of these reads an hour (Import limit reached. Try again in an hour.). And pasted text holds about 12,000 characters, plenty for one recipe (That’s a long one. Paste just the recipe.). If your browser won’t let the sheet hand the recipe to the editor — private browsing does that — the sheet says so, and the import works from an ordinary window.
A backup file — a ZIP exported from another Mirepoix, or several files at once — goes straight into your recipes from Choose a file, with no AI and no draft to look over. One text file is read like pasted text. See Markdown import for what becomes of each kind of file.
Importing from a photo takes AI, since reading a photo needs it. From a photo, and an image you pick with Choose a file, go to Mirabel’s photo reader, and that needs the deployment’s AI keys (Anthropic for Mirabel, Mistral for reading the photo). The browser bookmarklet needs one too: without a key its setup doesn’t appear, so there’s no way to get the button in the first place. Mirabel’s in-panel offers of these — Try a photo and Set up the grab-it button — drop out without a key as well. A photo can still come in without her: copy the text out of it yourself and paste it into the sheet.
Mirabel has her own way to add a recipe: tap Add a recipe among the starters in her panel. She reads a link, text or a file herself first, and turns to AI only when that read is unsure. Under a draft she read on her own, Use AI instead redoes it with AI. See Add a recipe, step by step.
Sharing a link from an Android phone’s Share sheet opens Mirabel with a confirm card. Tapping Import reads the page the same way: herself first, for free, and with AI only when that read is unsure. On iPhone and iPad this route isn’t available at all — Mirepoix doesn’t appear in the Share sheet there, key or no key. Paste the link into Add Recipe instead.
Always review the result before saving. AI import is a fast starting point, not a finished import. See Import a recipe with AI for the walkthrough.
Editing an existing recipe
Open the recipe, then tap Edit in the action row below the recipe header. The same full-page editor opens with the recipe’s current content — there’s no pop-up dialog. Its one other view is Rearrange, an outline for moving lines and steps.
Changes take effect when you tap Save to kitchen. You’ll be taken back to the recipe page.
If you change the title, the recipe’s web address updates to match the new name. A link you’d already shared keeps working — it opens the recipe at its new address. See Sharing a recipe.
Saving as you go
The editor keeps your work as you go. A few seconds after you stop typing — again the moment you switch away from the tab, and again right before you follow a link off the page — Mirepoix quietly sets your in-progress edits aside as a private draft. A closed tab, a flat battery, or clicking away doesn’t cost you the recipe.
A short line just above the card that holds Discard draft and Save to kitchen tells you where that stands — it sits apart from the buttons so they never move while it changes. It reads Draft saved · just now when the last one went through, and ages as you keep working — Draft saved · 4 minutes ago. If one of those background saves can’t reach the kitchen it reads Not saved — check your connection, and the next edit tries again.
The draft is private and unpublished. Save to kitchen is the deliberate act that puts the recipe in your kitchen: it reads Saving… while it works, then takes you to the recipe page with a Saved to kitchen. note. A Save to kitchen that goes through clears the draft. One that stops — a validation message, or the newer-version notice below — keeps it, so nothing is lost while you sort it out.
Leaving without saving
Discard draft is the one way off this page that actually throws work away, and it asks first: “Discard your draft? The kitchen’s copy stays as it was.” Dismiss the prompt to stay and keep editing; nothing is thrown away. Confirm and your draft — everything set aside this visit and before — is deleted; the kitchen’s published recipe is untouched. Edits that were only ever offered to you — from another tab or device, and that you never picked up — survive even Discard draft; Start fresh on the banner is how you let those go.
Every other way off the page — a link, the nav bar, closing or reloading the tab — asks nothing at all. Mirepoix saves whatever you were mid-typing right before the page goes, the same way it saves in the background as you work, so in the ordinary case these exits cost you nothing: the draft is waiting the next time you open the editor. Your browser used to raise its own leave-this-page warning here; it doesn’t any more, because there’s nothing left to warn about in the ordinary case. A few edge cases below can still cost you that very last stretch, silently. The Back button is the one exception to the save itself — it doesn’t trigger that extra send at all, so it carries the edge cases’ risk even on an ordinary connection with a small recipe.
Edits the editor put back for you on its own (below) and you never touched are a quieter case still: Discard draft, a link off the page, or Back takes you back with no prompt and deletes nothing — the edits are still waiting the next time you open that recipe.
A few cases are worth knowing, since nothing warns you about any of them. If the line beside Save to kitchen already reads Not saved — check your connection, the kitchen can’t be reached, and leaving tries once more to send that stretch of work on its way — but if the connection is still down, that attempt fails too and the work is lost, silently. Get back online and make one more edit — the next attempt goes through — or copy your work out of the document first. Separately, that last-moment send has its own size limit, tighter than an ordinary save’s — in the rare case of a very long, still-unsaved stretch of typing, it can be refused even on a good connection, again silently; copying your work out of the document is the same fallback. And a crash or a power cut is a different thing from closing the tab: closing or clicking away gives Mirepoix a moment to send your latest work on its way, while a crash gives it none. What’s at risk then is the typing you’ve done since your last pause — Mirepoix sets your work aside a few seconds after you stop, so a long unbroken stretch of typing hasn’t been sent yet, at any length of recipe (and the Back button, which skips that last-moment send entirely, carries the same risk on an ordinary connection too). The recipe is still safe; it’s that last stretch that isn’t. The fix is the same across all of these: stop for a moment before you go, and check that the line beside Save to kitchen has ticked over to Draft saved · just now.
Picking up where you left off
Open the editor again with edits waiting and one of three things happens.
Recent edits come back on their own. Edits set aside in the last 48 hours, with the recipe unchanged in your kitchen since, are put back into the document as the page opens. The status line says Resumed your edits from and when, with Start fresh next to it in case you’d rather not have them.
Older edits ask first. A banner at the top of the document says “You have saved edits from [when] that aren’t in the kitchen yet,” offering Pick up where I left off and Start fresh.
A recipe that changed underneath your edits always asks, however recent they are. Where it can tell, the banner names who saved that newer version and when — and says so plainly when that someone was you, on another device. Then it says what continuing costs: keep going and your next Save to kitchen replaces that version. It isn’t lost — it stays in Recipe history, where you can read or restore it.
Once in a while it can’t tell. Then the banner says only that the kitchen’s copy no longer matches what your saved edits were based on, and that continuing replaces it. It makes no promise about history there, because that case is the one where the recipe has no saved versions to fall back on.
Start fresh throws the set-aside edits away, and asks before it does: “Delete your saved edits? The kitchen’s version stays as it is.” That’s the whole of it — the recipe in your kitchen is untouched, and only your unpublished edits go. If the deletion can’t reach the kitchen the editor tells you and keeps them, rather than reporting a tidy-up that didn’t happen.
Continue Draft at the top of your recipes list, next to Add Recipe, finds them from the other direction. It appears when you have edits waiting, and lists a recipe you started but never saved — under the title you’d typed, or “Untitled recipe” — then each saved recipe with edits waiting, newest first, each with how long ago you left it.
What’s set aside is private to you. Another cook in the same kitchen editing that recipe never sees your work, and never overwrites it with theirs. It’s kept per recipe, so several half-finished edits can wait at once, and a recipe you started but never saved is offered back the next time you start a new one. Edits you never come back to are cleared after 60 days.
If someone saves the recipe while you’re in the editor, your Save to kitchen stops rather than overwriting their work: “Someone saved a newer version of this recipe while you were editing,” with Load newest version and Copy my edits as text.
A page that has outlived its security check — most often because the iPhone app was closed in the background while the editor was open — renews it on its own: Save to kitchen, the set-aside draft, and pasting a whole recipe all try once more with a fresh one before telling you anything. If that doesn’t help, your sign-in has most likely ended. Save to kitchen then says “Couldn’t save — your session may have ended. Your edits are still here: copy them before you reload the page,” with Copy my edits as text, and leaves everything you typed in place.
Some checks only the kitchen can make, once Save to kitchen has sent the recipe — a count typed into Makes’ of what box is one. When the kitchen refuses a save, its message lands where the problem is, the same way the editor’s own checks do. The box at fault is marked. When no single box is to blame — a problem with one of an ingredient’s substitutes, say — the message sits beside that line and no box is marked. Either way it joins the list by Save to kitchen, and the editor puts you there. A marked box clears when you edit that box, and a line’s message when you edit anything in that line; editing somewhere else leaves it showing. The message appears in a banner at the top of the page instead only when it names no place the page still has, or when you changed that box or line while the save was on its way — then the banner adds You changed this while it was saving. Save again to check.
Every text change becomes a version
Every save that changes the recipe’s text is recorded as a version — you don’t have to do anything to keep a record of your changes. A Save to kitchen that changes nothing adds nothing to the history, and neither does a save that only swaps the photo: a version records the written recipe, not the picture. Neither does a save that only changes which ingredient a line is matched to (see Check ingredients). Some saves also carry a short note that Mirepoix writes for you, such as renaming a tag, which updates every recipe that carries it. Tags or a category Mirabel adds on your tap, and a recipe you first save from one of her drafts, are marked via Mirabel instead, so you can tell her changes from your own. An edit she proposes that you save here is your own save, with no mark. See Recipe history to browse past versions and restore an earlier one.
Deleting a recipe
Open the recipe for editing, scroll to the end of the document, then tap Delete this recipe…. You’ll be asked to confirm.
Deleting a recipe removes it from the recipe list and takes it off the menu. It doesn’t tidy your grocery list for you: anything you’d already put on the list stays there, minus the amount and the recipe name the deleted recipe was contributing to it. Any recipes that cross-reference the deleted recipe will show a broken reference notice.
A deleted recipe isn’t gone for good. It moves to Recently deleted at the bottom of the recipe list, taking its photo, star and pin with it, and you can restore it from there. See Recipe history.
See also
- Recipe photos — add, replace, or remove the photo in the recipe’s header
- Scaling a recipe — halve or double a saved recipe’s quantities
- Tags and categories — more on the Category and Tags fields in the editor
- Check ingredients — the ✓ or ? on each ingredient row, and choosing the ingredient a line means
Last updated October 15, 2026